Giving your new home a good deep clean before moving in will get you off to a great start. We’ve got some cleaning tips for homeonwers listed here. Even if you trust the previous owner to do the due diligence, you can never be 100% certain it’s to your liking. Or, if you are moving into new construction, there’s probably a gray cast of dust and debris lurking in unexpected places. That’s why it is always a good idea for homeowners to do some pre-move cleaning – and we’ve got some tips to help make your new place spick-and-span. During your cleaning process, you might even discover some things that need repairing or replacing.

Gather everything you’ll need for your pre-move cleaning
When it comes to equipment/tools, make sure that you have the following:
- Vacuum;
- Broom;
- Dust mop;
- Toilet brush;
- Duster;
- Bucket;
- Step ladder;
- Spray bottle.
As for the materials, you’ll want to get:
- A pair of rubber gloves;
- Non-abrasive sponges and abrasive sponges;
- Cleaning brush;
- Paper towels;
- Cleaning rags;
- Newspaper;
- Liquid dish detergent;
- Window cleaner;
- All-purpose bath and kitchen cleaner;
- White vinegar;
- Toilet cleaner;
- Wood cabinet cleaner;
- Baking soda;
- Chlorine-free bleach;
- Floor cleaner;
- Oven cleaner;
- Degreasing cleaner.
Most importantly, you need to be able to set aside enough time to do the work. And, with the relocation on top of your standard day-to-day hectic schedule, squeezing in the time for thorough housecleaning might be a bit tricky. Luckily, you can always hand it over floor cleaning to professional cleaners who can do more detailed work while you focus on the rest of your checklist.

Start with the bathroom
Your bathroom is the perfect place to start your pre-move cleaning since you’ll probably need to use it throughout the cleaning process. As always, the rule of thumb is to start at the top and move down.
- Use your duster to get rid of dust, cobwebs, and dander, and cover everything from ceiling and corners to fans, vents, window coverings, and light fixtures. Thanks to your telescopic wand vacuum attachment, you’ll be able to reach all high and tough-to-reach areas.
- Wipe down windows and mirrors with the window cleaner.
- Move on to the medicine cabinet, drawers of the bathroom vanity, linen closet, and the hardware. You can use an all-purpose cleaner to dampen a clean cloth or paper towels.
- Scrub the tub, shower, and enclosures with an all-purpose or tub cleaner. If the tub is new or reglazed, it’s best to use a non-abrasive cleaner. And if there’s soap scum lingering on a glass shower door, a vinegar solution will do the trick.
- Use a toilet brush to scrub the toilet and paper towels or sponges for the outside and the back of the toilet. Put your disinfecting cleaner to use and clean inside and outside of the toilet for best results. Also, consider swapping the old toilet seat with a new one.
- For the sink area, use non-abrasive cleaners. If you have an old toothbrush, use it to dig into the openings and seams. Finally, grab a clean cloth to buff the faucet.
- If you identify any deeper issues, such as mold, you can try commercial treatments and DIY solutions. If these methods don’t get the job done, call the experts for professional treatment.
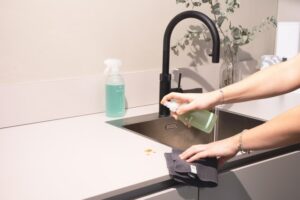
Move onto the kitchen
Time to move on to where all the icky and sticky things collect. To best get rid of the previous tenant’s cooking smells, opt for the same top-to-bottom method you’ve used in the bathroom. Once you’ve vacuumed high and low, proceed to clean the cabinets, counters, and all major appliances. Needless to say, always take into account the materials your kitchen furniture is made of when choosing your cleaning product. For instance, if the cabinets are made out of wood, use a cleaner formulated explicitly for wood cabinets.
Next is the kitchen sink. Pour the chlorine-free bleach into a spray bottle, and then add some water. After spraying the sink, you should let it soak for a while before rinsing it thoroughly. A mixture of baking soda and water should help you remove any lingering sink odors. Finally, sweep and mop the kitchen floor, or better yet, call the professionals to giv ethe floors a deep cleaning. https://accentamerican.com
Tackle the bedroom
Another area you should clean before moving into your new home is the bedroom. Luckily, bedrooms don’t usually require as much cleaning as the rest of the home. Still, this doesn’t mean you shouldn’t give them a clean before your belongings arrive. It’s a much simpler task when you don’t have to work around a giant bed and moving boxes.
As in every other room, you’ll want to dust everything to remove any dirt, paying attention to window sills, light fixtures, and those easily-neglected spots such as the top of the doors. Next, if there’s built-in furniture, wipe all surfaces clean using a dusting spray or glass cleaner. While you’re at it, use a streak-free cleaning agent to wipe down the windows and glass-paneled doors. Finish by giving the floors a good clean.
Living spaces and hallways
Just like bedrooms, these areas won’t require much of your time and energy. Still, don’t forget to look for those spots that may need more attention. For instance, you can be sure to wipe down light fixtures or ceiling fans that the previous owner could have easily neglected. Cleaning the walls and ceilings may also be something you’ll want to focus on. Of course, you should always be careful of what these surfaces are made of. For instance, glossy paint can easily endure some scrubbing, while flat paint needs a gentler touch. If there are wallpapers, use a dry cloth to wipe them, and then proceed by giving them a very gentle wipe with a water/soap mixture. As always, finish up with the floors.
Finally, when the time comes for the movers you’ve hired to bring your furniture, make sure their pathways are clear. If the hallways are clear of any clutter and obstacles, you can easily leave all tasks to experts without worrying someone might get hurt, or something might get damaged.

Ready to move in
Now that your new house is spotless, you’re ready to unload the moving truck and start making it a home. Pre-move cleaning may be a lot of work, but the final result will make everything feel worth it. Still, a project of this size may not be for everyone, so don’t shy away from seeking the help of professionals. This way, you can devote yourself entirely to settling into your new home. Whatever your choice, move-in cleaning goes a long way toward making your transition fast and seamless so that you can feel comfortable in your new digs.